Page #6 |
INSTALLATION MANUAL |
STEP 2: PAGE 4 OF 4 |
ATTACHMENT CHANNEL AND WALL CHANNEL
DIAGRAM 2.6
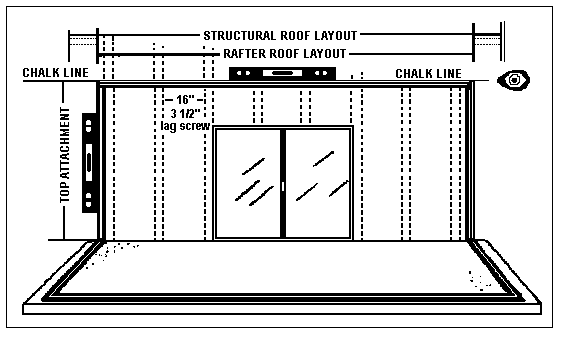
DIAGRAM 2.7
|
DIAGRAM 2.7
|
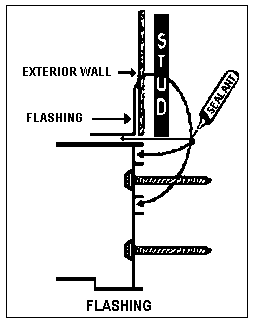
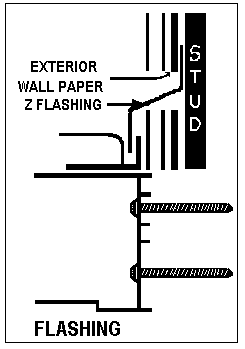
DIAGRAM 2.6
The adjustment Channel or Wall track is placed in the Bottom Track at the house wall and plumed up to the top attachment height of the Attachment Channel (look at the layout sheet for top Attachment Height, not wall height). Place a mark on the outside of the Adjustment Channel at that height. If done on both sides and measured from mark to mark, this should be the same dimension as the front wall width.
DIAGRAM 2.7
Chalk two level lines on the house wall. The top line will be at the top Attachment Channel height.and the second line, 1 3/4" below the top chalk line (1 1/2" for Weatherguard Roof Attachment Channel) reflects the center of the Attachment Channel. This is also where to drill through the house wall and find the studs to attach to . Locate studs in the house wall (should be about every 16") by drilling along the lower line, remember not to go beyond the widths of the Attachment Channel. The Attachment Channel will cover these holes drilled into the house wall.
DIAGRAM 2.8
If the Attachment Channel requires counter flashing, as in the case with wood siding, it will be necessary to remove a course of siding or cut a groove in the house walls that counter flashing may be attached under the felt paper behind the siding. After the studs have been located, use the Attachment Channel to make a template and mark the location of the studs. The beam roof will have the Attachment Channel cut to the room width. The foam roof Attachment Channel will be longer than the room width to allow for overhang that acts like eaves on the house. Double check the overall roof length of the Foam Roof. Pre drill 1/4" holes at the location of the studs you marked on the Attachment Channel. For stucco walls remove and caulk the back of the Attachment Channel with sealant and secure with 3 1/2" Lag Screws. On walls with siding secure the Attachment Channel just under the counter flashing.