Next step is to drill holes in Header Beam with a 1/4"
drill bit & place on Front Wall Modules, then place one or two Rafters into Attachment
Channel & rest them on Front Wall Header Beam, Note: You will need to move Front Wall
Modules side ways to gain access to the screw holes in Header Beam, since screws enter
from underneath through header into Rafter, Once this is done you can mark Rafter ends to
be out (only if required). Next install remaining Rafters to Attachment Channel &
Header Beam(if three are shutter tracks attached to Rafters proper placement will be
required). Attach the rafters to the Attachment Channel and Header Beam with #1 4 x I
" Tek screws .
See Diagram 5.2DIAGRAM 5.3
Refer to the layout sheet of materials to confirm the dimensions
of the insulated roof panels & glass. The roof panels should be 2' to 4' wide. There
are two sides to the roof panels, the aluminum side should face the sky, & the groove
should face the the next panel in that bay. Starting with the front insulated roof panel
the panel should be placed between each Rafter,resting on the inside log of each Rafter
& flush with the end of each Rafter.
DIAGRAM 5.4
When the Insulated Roof Panels are in place & in line the
Solid to Glass Stiffeners should be placed on the panel,the groove in the panel should
accept the groove on the side of the Stiffener. |
DIAGRAM 5.2
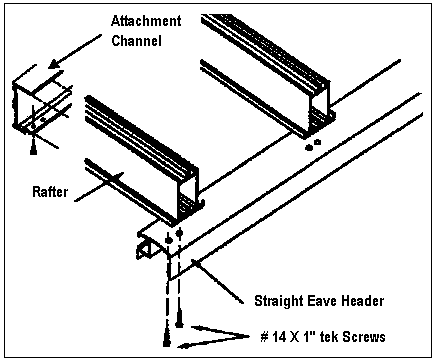
DIAGRAM 5.3

DIAGRAM 5.4
|