Page #22
|
INSTALLATION MANUAL
|
STEP 6: PAGE 2 OF 3
|
CLASSIC WEATHER GUARD FOAM ROOF SUNROOM
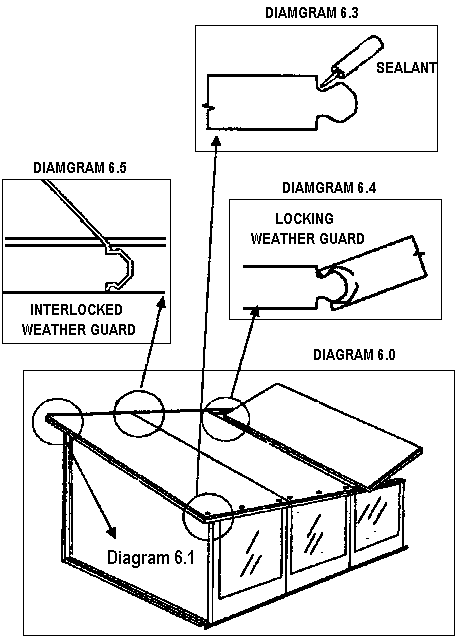
DIAGRAM 6.2
When the Front wall is plumb, secure the Weatherguard Roof Panel
to the Header Beam. This is done by measuring the overhang of the roof from the plumb
front wall on the underside of roof to the Header Beam Add 3/4" to this measurement
and mark the top side of the roof, 4" from the seam edge,(there should be a screw
4" on each side of the seam joining the roof Panels) this measurement will give a
strong bite into the Header Beam but will not penetrate the electrical raceway in the
Header Beam. Secure the Weatherguard Roof Panels to the Header Beam with 4" lag
screws with washers attached, (4" roof will require 5" lag screws) finish
securing the roof panels with screws 12" on center. |
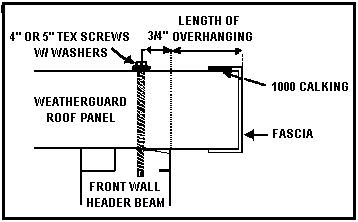 |
DIAGRAM 6.3
The next Weatherguard Panels tongue and groove should be cleaned
and free of oil and dust. The tongue side that mates with the first Panel should have
silicone applied to the top of the tongue. This is to ensure a weathertight seal after
interlocking the panels together. This will also seal the roof with a seal that is not
exposed to the UV rays of the Sun.
DIAGRAM 6.4
Place the second panel, parallel to the first, 3" from the
Attachment Channel and overhanging the Header Beam. Tilt the panel up and push towards
first panel until the top of the panels are interlocked. Slowly lower the panel until the
bottom of the tongue & groove are interlocked. See Diagram 6.5 Now push
the second panel into The Attachment Channel and secure the panel to the Attachment
Channel. Plumb the wall module under the second roof panel and secure the roof panel to
the Header Beam. Repeat this process for the remaining Weather guard Roof. Seal all of the
Weatherguard seams with a small bead of Silicone, for a second weathertight seal. Seal the
top junction of the Weatherguard Panels to the outside lip of the ,Attachment Channel.
Seal all of the Weatherguard seams with a small bead of Silicone,for a second weather tight seal. Seal the top junction of the
Weatherguard Panels to the outside lip of the Attachment Channel. |
 |
|