Page #19
|
INSTALLATION MANUAL
|
STEP 5: PAGE 4 OF 5
|
CLASSIC CURVED ROOF SUNROOM: Roof solid and Glass Installation
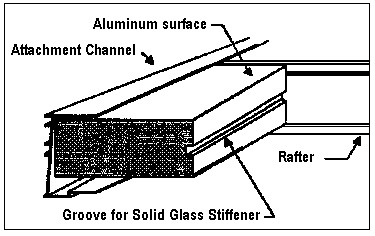
DIAGRAM 5.8
Refer to the layout sheet of materials to confirm the dimensions of Insulated Roof
Panels and glass.The Roof Panel should be 2' to 4' wide.There are two sides to the
Insulated Roof Panels, the aluminum side should face the sky, and the grooved end should
face the front wall. Place the Insulated Roof Panel between each Rafter, resting on the
inside leg of each Rafter, after all Roof Panels have been placed between the Rafters,
push each Panel to the back of the Attachment Channel. If the room is square,the front end
of each Panel should line up uniformly. If this line irregular you can adjust this by
pulling the panels out of the Attachment Channel up to I' or by cutting the back end of
the panels to the desired length.
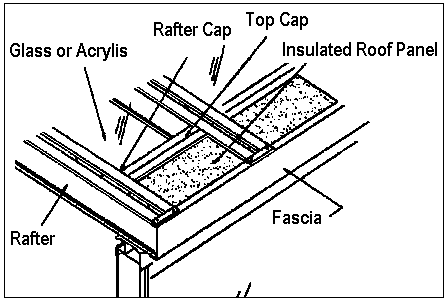
DIAGRAM 5.9
Locate the Fascia channel over the ends of the Rafters and
Insulated Roof Panels secure with #8 x 1/2" Phillips self drilling screws up through
the bottom leg of Fascia into bottom of Rafter. Place the Rafter Cap on the Rafter if
there is need to cut the Rafter Cap the cut will have to be made on the back end of the
Rafter Cap so as not to disturb front end closure angle. The Front end closure angle
should be flush with top edge of Fascia. |
DIAGRAM 5.8

DIAGRAM 5.8

|
|

