Page #25 |
INSTALLATION MANUAL |
STEP 7: PAGE 2 OF 2 |
SIDEWALL INSTALLATION USING TRAPEZOIDS
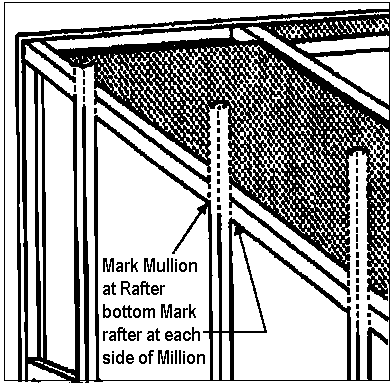
DIAGRAM 5.1While the Modules are level and plumb mark the bottom of the Rafter where the outsides of the vertical Mullions meet. This is where to connect the Sidewall Bracket to the bottom of the Rafter. Also mark the Bottom track at the outsides of the Vertical Mullions. This will give you a plumb wall when you re-assemble the Modules. Repeat this process for all the Vertical Mullions. When this has been completed, you should have all Vertical Mullions marked for cutting, Sidewall Brackets as well as marks on the Bottom Track. DIAGRAM 5.2Attach Sidewall Brackets to the bottom of the rafter where you marked them with # 8 x 3/8" Phillips machine screw. DIAGRAM 5.3After the Mullions have been cut to size. Place the Module closest to the front wall, in the Bottom Track and slide forward until it meets the Module in Front Wall. This should line up with the first Side Wall Bracket on the Rafter and the first marks on the Bottom Track. Follow this procedure for the rest of the Modules until you reach the house wall. If there is any gap remaining between the house wall and the last Module,solid fill or the adjustment channel split down the middle will fill the gap. Double check all measurements fasten all the Modules to the bottom Track and the Side Wall Brackets. Seal the bottom of the Modules at the top of the Bottom Track. |
DIAGRAM 5.1
|
The vertical and horizontal Mullions in the Sidewall above the windows have kickplate jamb material that hold the glass in place. The bottom of the Rafter has a groove that will align with the legs of the kickplate jamb. This groove will allow the acrylic or glass to slide up into the Rafter. Measure from the outside ledge of the horizontal kickplate jamb to the bottom of the Rafter. This will give you the size to cut the acrylic or glass and the vinyl window clip. The vinyl window clip for the horizontal member over the window will be pre-cut to size, After all cuts have been made, start on one bay and work your way across the wall. The glass should slide 1/4" up into the Rafter. The vinyl window clip inserted in the retaining pocket of the kickplate jamb will secure the acrylic or glass, When all Vinyl Clips have been secured, seal the interior and exterior acrylic or glass to the bottom of the Rafter